Auto vehicles paint defects become inevitable during the years of driving, but they are always solvable.

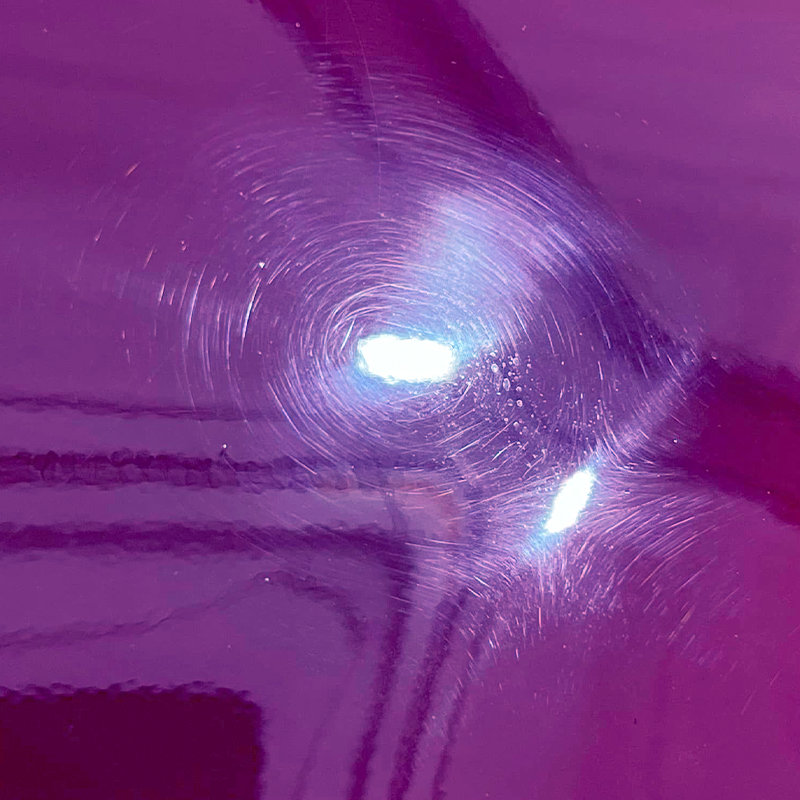
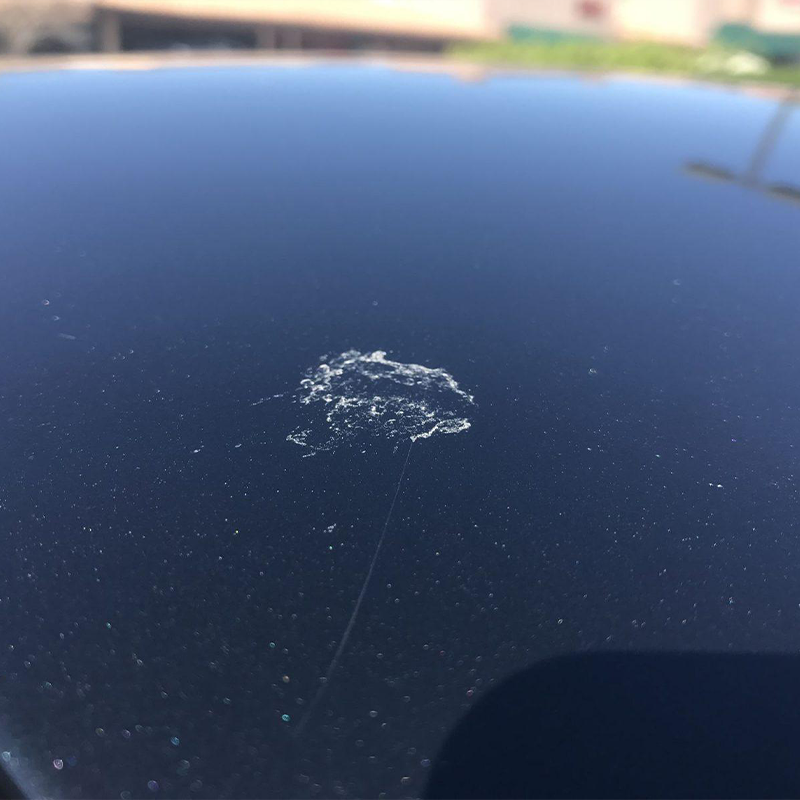
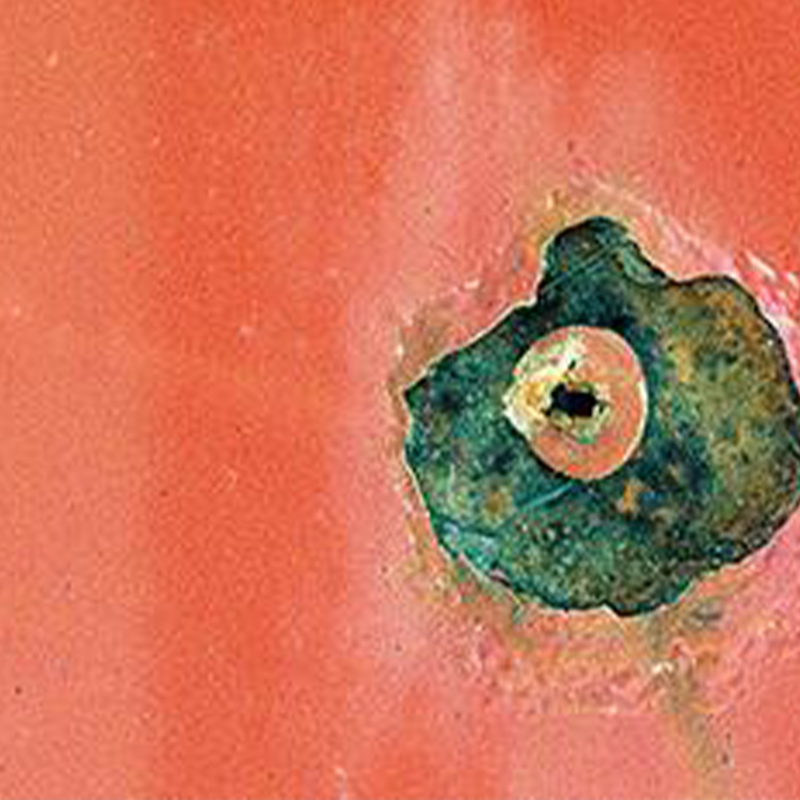
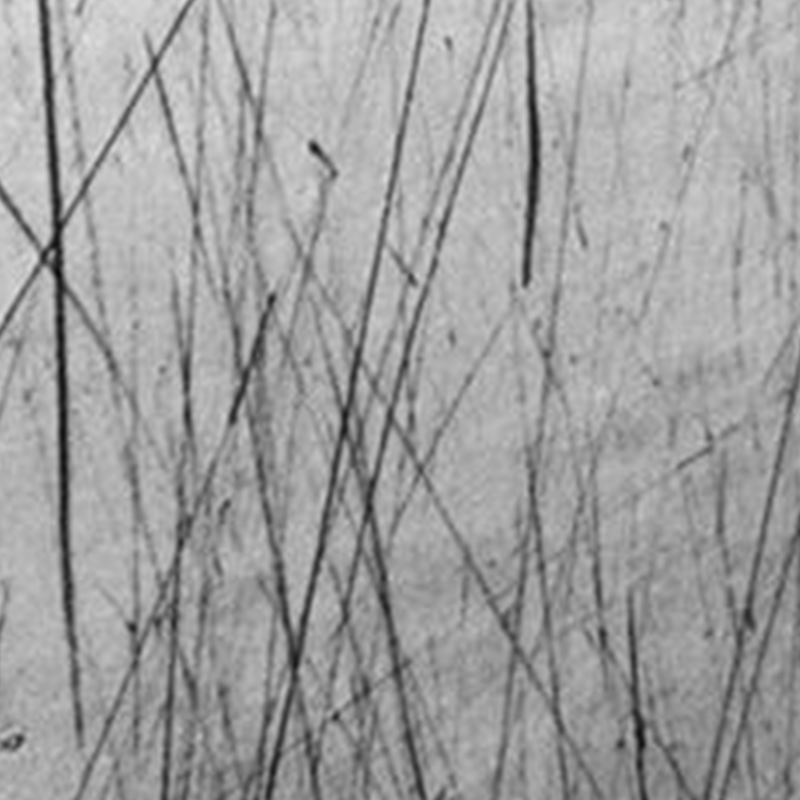
There are more paint defects than you might think, and even more reasons why they occur. Defects occur on cars, due to improper painting, when the vehicle is involved in a car accident, which makes it difficult to avoid external conditions. Car painting is also important for the proper performance of the work - the preparation of materials and the conditions of the painting spaces.

Car paint defects are almost inevitable in practice, so it is important to know how to identify them so that the defects can be fixed quickly and smoothly. We invite you to familiarize yourself with the defects in order to achieve the best results.

RUNS

Causes
  • Hardener/reducer too slow
  • Viscosity too low
  • Material or object to be painted too cold
  • Paint applied too wet
  • Excessive film builds
  • Flash-off times too short
  • Spraygun held too close to the object
  • Spray nozzle too large
  • Irregular spraying action
How to avoid
  • Adapt material, spraygun and spraying technique to application conditions in the workshop. If necessary, clean spraygun and use a smaller nozzle.
Repair
  • When the paint has thoroughly dried, remove the run with a sanding block, carbon block or wet sanding paper. The finer the paper, the less damage to the paint and the easier to polish. Polish with Glasurit 562-1602 Fine Polishing Compound and finish with any standard high-gloss polish.

POOR HIDING

Causes
  • Color of substrate not matched
  • Color with poor hiding power (e.g., no heavy metal pigment)
  • Topcoat overthinned
  • Topcoat not stirred properly prior to use
  • Paint layers applied too thinly
How to avoid
  • For translucent colors in particular (pearl effects in a three-layer system), a uniform substrate is required.
  • For colors with poor hiding power, use Glasurit 285-95 HS Tintable Filler (see image below). Alternatively, use primer filler/surfacer mixed at a level of brightness matching the topcoat, such as Glasurit 285-55 HS VOC Primer Filler black mixed with 285-65 HS Primer Filler white, or, with the wet-on-wet method, Glasurit 285-39 VOC Non-Sanding Filler dark grey mixed with 285-38 VOC Non-Sanding Filler white.
  • Stir the paint material thoroughly and thin only as specified.
  • Spray sufficiently thick coats and allow for sufficient flash-off times between coats (solid colors 50-70 µm, metallic effects 15-25 µm).
Repair
  • After drying, sand down and apply a new finish.

ORANGE PEEL EFFECT

Causes
  • Spraygun held too far from object
  • Spray pressure too low (poor atomization)
  • Paint film too thin
  • Viscosity too high (paint too thick)
  • Hardener and/or thinner too fast for the conditions or size of object
  • Spray nozzle too small
  • Flash-off time too long between coats
How to avoid
  • Keep spraygun within the recommended distance from the object. 
  • Ensure spray pressure is as recommended. 
  • Always apply wet coats. 
  • Adjust paint viscosity as recommended. 
  • Choose correct hardener and thinner.
  • See tech data for correct choice of spray nozzle. 
  • Allow a long enough flash-off between coats.
Repair
  • For minor problems, sand down with P1200, polish with Glasurit 562-1602 Fine Polishing Compound and finish with any standard high-gloss polish. For major problems, sand down completely and apply a new finish.

LOSS OF GLOSS

Causes
  • Paint sinkage
  • Excessive film thicknesses
  • Weathering (results of the action of sulfur dioxide or nitrogen oxide combined with moisture and/or severe UV radiation)
  • Wrong amount of hardener
  • Poor or incorrect paintwork care
  • Incorrect polishing (polish too aggressive or polished in direct sunlight)
  • Weathered surfaces due to poor paintwork aftercare
  • Car wash brushes too coarse
  • Car cleaning agent too aggressive or concentrated
  • Newly repaired paintwork weathered too early. Thick coats or newly repaired paintwork are sensitive to condensation (below dew point)
  • Insufficient air circulation during drying
How to avoid
  • See entry on “Sinkage”.
  • Keep to recommended film thicknesses. Use the Glasurit grey shade concept for poor covering colors (yellow/red). The Glasurit grey shade concept comprises the Glasurit HS primer fillers 285-505 gray, 285-555 black and 285-655 white.
  • Ensure regular paintwork after-care.
  • Keep to recommended mixing ratios.
  • See entry on “Aftercare of vehicle paintwork”.
  • Keep to recommended film thicknesses and drying times.
  • Check air circulation, replace floor and ceiling filters if necessary. If in doubt, consult your spraybooth manufacturer.
  • See entry on “Sinkage”.
Repair
  • First polish with Glasurit 562-1602 Fine Polishing Compound and finish with any standard high-gloss polish. If the gloss cannot be restored, you need to repaint.

LOSS OF ADHESION

Causes
  • substances, which can cause adhesion failure, were left on the substrate when it was painted (e.g., silicone, oil, grease, wax, rust, sanding residue, etc.)
  • an unsuitable primer was applied to the substrate
  • the substrate was sanded insufficiently or not at all
  • undercoat or basecoat were applied too dry or too thin
  • drying conditions were not respected.
How to avoid
  • To avoid loss of adhesion, always use the suitable primer for the respective substrate (e.g., for aluminum or plastic). Apply undercoat materials as specified (in the technical data sheets). Do not apply excessive film builds. Thoroughly clean the substrate before painting.

Repair
  • Remove all coats with poor adhesion. Thoroughly sand and clean the substrate. Repaint using the recommended undercoats and/or topcoats.

SOLVENT BOILS/POPPING

Causes
  • Excessive film build
  • Hardener and/or reducer too fast
  • Flash-off time between spraycoats too short
  • Flash-off time before baking or infra-red drying too long
  • The panel temperature becomes too high when the distance between IR lamps and painted object is too small
  • Flash-off time between spraycoats too short for wet-on-wet process
How to avoid
  • Keep to recommended film builds.
  • Use hardener and reducer suitable for the ambient temperature.
  • Keep to recommended intermediate flash-off times.
  • When using Glasurit products, no flash-off time is required before baking.
  • Keep to recommended distances and intensities when drying with infrared.
  • Keep to recommended film builds and flash-off times between coats.
Repair
  • For surface defects caused by solvent boils, sand the paint system down to a “sound” substrate. Refinish using the recommended undercoats and/or topcoats. If solvent boils are not completely removed by sanding, pinholes will appear once the next coats have been applied.

CRINKLING

Causes
  • Flash-off time too long when working wet on wet with 2K products (gel phase)
  • Recoating of solvent-sensitive layers (NC/TPA) with the wrong repair materials or with excessive film builds
  • Film thickness of sealing coats too low (applied too thin or sanded down too far)
  • Substrate layers not thoroughly drie
How to avoid
  • Always keep to recommended flash-off times.
  • ​Carry out a solvent test and select a suitable paint system.
  • Keep to recommended film builds.
  • Re-dry the substrate, if necessary (e.g., with IR lamps)
Repair
  • Sand down the paint system to a “sound” surface. Refinish using the recommended undercoats and topcoats.

BLEEDING

Causes
  • Excessive peroxide from a polyester body filler causes a yellow-brownish stain in the topcoat. Blue and green colors are particularly vulnerable to this problem
  • Soluble dyes from the old paintwork are dissolved by the solvent of the repair materials and thus change the color of the surface.
  • Residues from bitumen and tar.
How to avoid
  • Only use the recommended amount of peroxide hardener for the polyester body filler. Mix hardener and body filler thoroughly.
  • Carry out a solvent test. Soluble dyes have not been used in OEM coatings and in any Glasurit repair materials for many years.
  • Remove all residues from bitumen and tar before painting.
Repair
  • To repair areas damaged by “bleeding”, use suitable isolating products, such as Glasurit 1109-1240/4 Stone Chip and Underbody Protection or Glasurit 801-72 VOC EP Primer Filler, if applicable. In case of major damages, sand the paint system down to a “sound” surface. Refinish using the recommended undercoats and topcoats.

DUST INCLUSIONS

Causes
  • Poor cleaning of substrate prior to painting
  • Lint containing overalls or clothes
  • Spray booth dust problem due to dirty and clogged filters causing incorrect air supply and incorrect overpressure
  • Intake of contaminated air (polishes, fine dust etc.) from other parts of the workshop
How to avoid
  • Clean thoroughly before applying the paint.
  • Use lint-free overalls and cloths.
  • Have air flow settings set by the booth manufacturer.
  • Ensure regular cleaning and maintenance of the spray booth and filters.
  • Ensure that polishing/finishing areas are away from the paintshop and are separated by a filtering and ventilation system.
Repair
  • Polish with Glasurit 562-1602 Fine Polishing Compound and finish with any standard high-gloss polish. For major problems, sand down completely and apply a new finish.

BLISTER APPERANCE

Causes
  • The surface to be painted (filler, bare metal, etc.) was not cleaned thoroughly. Contamination from salt residue, e.g., dirty sanding water or hand sweat, was left on the surface before painting. The blister pattern may indicate the cause (beading = wipe marks, prints = finger or hand prints)
  • Wet sanding of polyester products without sufficient time to allow water to evaporate before application of undercoats and topcoats.
How to avoid
  • Thoroughly clean the areas to be painted with clean tap water. Change sanding and cleaning water regularly, especially in winter when vehicle paintwork is covered in salt. Finally, (depending on the substrate) clean the area with Glasurit 700-1 Cleaner, Glasurit 541-5 Wax and Silicone Remover or Glasurit 360-4 Metal Cleaner.
  • Do not wet sand polyester products, use dry sanding only.
Repair
  • Sand down the paint system to a “sound” surface. Refinish using the recommended undercoats and topcoats.

CLOUDING

Causes
  • Uneven basecoat application
  • Basecoat flash-off time too short prior to application of clearcoat
  • Basecoat applied too wet or too thin
How to avoid
  • Apply basecoat evenly. 
  • Keep to recommended flash-off times.
  • Apply the basecoat as recommended in the technical data sheets
Repair
  • If clouding/mottling occurs during the application of the basecoat, compensate by spraying a mist coat (basecoat) over the affected area. If clouding/mottling occurs after the clearcoat has been applied, allow to dry, sand down, and repaint.

POLISHING MARKS

Causes
  • The sensitivity of the paint surface to polishing marks is greater when: the paint has not been allowed to dry for long enough; the film thickness is too high; the incorrect choice or amount of hardener has been used
  • Excessive pressure has been exerted on the polishing machine, (polish burnt in)
  • Polishing machine tilted during polishing process
  • Wrong polishing head
  • Aggressive/coarse polishing paste
  • Polishing when the painted surface is too hot from the oven or in direct sun light
How to avoid
  • Ensure the correct film thickness, drying times and amount of hardener and thinner are observed. Before polishing, allow the paint layers to dry sufficiently (rebake using infrared if necessary).
  • Do not press too hard or tilt the polishing head and use the correct head for the application being carried out.
  • Ensure that the paint surface is cool and/or not in the sun.
Repair
  • Polish with any standard high-gloss polish. If necessary, start polishing with Glasurit 562-1602 Fine Polishing Compound.

CONTOURING

Priežastys
  • Plotas nėra izoliuotas arba izoliuotas netinkamu užpildu
  • Užpildas padengtas neteisingai
  • Netinkamas maišymo santykis, per plonas sluoksnis arba per daug nušlifuotas iki pagrindo vietos.
  • Nepakankamas substrato džiūvimas arba sukietėjimas
  • Per didelis sluoksnio storis.
  • Šlifavimo popierius per šiurkštus
Prevencija
  • Naudoti tik rekomenduojamą peroksido kietiklio kiekį poliesterio glaistui. Kruopščiai sumaišyti kietiklį ir glaistą
  • Atlikti atsparumo tirpikliams testą
  • Prieš dažant pašalinti visus bitumo ir dervos likučius
Defekto taisymas
  • Norint pataisyti pažeistą zoną, visa vieta turi būti izoliuota atitinkamu izoliatužoriumi
  • Jei kraujavimo pažeidimas yra stiprus, dažų sluoksniai turi būti nuimti iki metalo ir vėl padengti tinkamu gruntu ir viršutiniu sluoksniu

EXTERNAL INFLUENCES

Causes
  • Tar – Appearance: Dirty, brown-black spots
  • Industrial waste gas, e.g. SO2 – Appearance: Large area or spot area gone matt
  • Acid rain – Appearance: No short-term visual effect, but can go matt
  • Acid (battery) – Appearance: Usually destroys the entire paint build down to the metal
  • Tree sap – Appearance: Thread-like and droplet shaped, sometimes clear and sometimes brown-yellow marks with swelling
  • Insects – Appearance: Marks of insect bodies visible in the paint surface
  • Insect secretions – Appearance: e.g., bee droppings: long yellow-brown marks. Greenfly excrement: round, ring-like etchings
  • Bird droppings – Appearance: Appearance can vary depending on the type of bird, weather conditions and duration of contamination
How to avoid
  • Remove all foreign bodies and matter from the paintwork as soon as possible. Wash off tar and tree sap using Glasurit 541-5 Wax and Silicone Remover. Remove all other contamination with water. Regular paintwork aftercare is required (washing, polishing, wax protection)

Repair
  • Depends on the size of damage. For damage to the topcoat, first attempt to polish out the problem using polishing compound and finish with any standard high-gloss polish. As a second step, sand the area with P1200 and then polish with Polishing Compound and finish with any standard high-gloss polish. For major damage, sand down to a “sound” substrate and repaint as necessary.

STONE CHIPPING

Causes
  • Stones are flung onto the paintwork at varying levels of energy (velocity/size). Depending on the impact force, the top layers and also the lower paint layers underneath can be damaged down to the substrate. At the points of damage, humidity will penetrate the coating and lead to corrosion creepback and flaking.
How to avoid
  • There is no total protection against stone chips. Areas most greatly at risk can be given preventive treatment of additional stone chip and underbody protection (Glasurit 1109-1240/4 Stone Chip and Underbody Protection black) and/or the use of Glasurit 522-111 Softface Additive (4:1 by vol. in topcoats and clearcoats). An extremely scratch-resistant clearcoat, such as Glasurit 923-447 HS VOC Clear, scratch-resistant, offers protection against small stone chips.
Repair
  • Stone chips should be touched-up immediately. Refinish using the recommended undercoats and/or topcoats.

WATER SPOTTING

Causes
  • Insufficient drying of freshly applied coating
  • Excessive film builds are particularly sensitive
  • Wrong amount of hardener
How to avoid
  • Keep to recommended drying times, film builds and mixing ratios.
Repair
  • First wash with clean water. If this does not remove the problem, polish with Glasurit 562-1602 Fine Polishing Compound and finish with any standard high-gloss polish. For major problems, sand down and apply a new finish.

PINHOLES

Causes
  • Solvent boils in the (old) paintwork
How to avoid
  • Either sand out the solvent boils completely or fill them with body filler.
Repair
  • Pinholes can only be repaired successfully by thoroughly sanding the substrate or by filling the holes with body filler.

CRATERING

Causes

Mainly: Oil, grease, wax and silicone residue (e.g., polishes containing silicone):

  • Humans – impregnated working clothes, rubber gloves, skin and hair care products
  • Spraybooth – lubricants from moving parts, mold release agents from plastic add-on parts, hoses and sealing compounds, poorly cleaned oil and waste water separators, dirty filters in ceiling and floor
  • Paint materials – incorrect use of additives (anti-silicone additive), unsuitable reducers (hardeners) from other suppliers, impurities in the coating due to deficiencies in transport and storage
  • Workpiece – residues from mold release agents on plastic parts, residual drawing agents and lubricants, soldering pastes, bitumen and oil from insulating mats
  • Painting process additives – mold release agents from new sponge cloths, unsuitable cleaning agents and cloths, unsuitable sanding media (scouring cleaners), adhesive from adhesive tapes
  • Environment – aspiration of contaminated air (polishing agent, silicone spray, fine dust, etc.) from other parts of the bodyshop, seals and insulating materials from the building.
How to avoid
  • Items 1-6 list possible sources of cratering. Consequently, various preventive measures to eliminate cratering can be established. As a basic principle, we recommend to use only silicone-free products in paintshops and to thoroughly clean the substrate.
Repair
  • Items 1-6 list possible sources of cratering. Consequently, various preventive measures to eliminate cratering can be established. As a basic principle, we recommend to use only silicone-free products in paintshops and to thoroughly clean the substrate.

WRINKLING

Causes
  • Synthetic resin applied too thick
  • Insufficient addition or no addition of drier
  • Unfavorable drying conditions (e.g., very high ambient temperature)
How to avoid
  • Keep to recommended film builds.
  • Add amount of drier specified in the mixing formula.
  • Ensure that drying conditions are favorable.
Repair
  • For minor wrinkling, allow the affected surface to dry completely and then sand it off to a well-cured coat and apply a new finish. For severe wrinkling, strip the paint layer completely and repaint.

CORROSION CREEPBACK

Causes
  • Mechanical damage to the paint surface (e.g., stone chips, scratches) causing penetration of moisture to the underlying coats or metal substrate
  • Poor preparation of the metal prior to painting. Insufficient cleaning (see entry on “Blistering”). Poor derusting or poor removal of metal particles left on the surface from sanding
  • Flash rust formation, e.g., on newly sand-blasted surfaces
  • Inadequate or missing cavity sealing (rust perforation)
How to avoid
  • Repair damaged paintwork immediately.
  • Thoroughly clean the metal surface with Glasurit 360-4 Metal Cleaner. Remove all rust by sand blasting to produce a bare metal substrate. Tin all welded seams.
  • Prime all sand-blasted areas immediately.
  • Seal and protect all areas as recommended.
Repair
  • Remove paint system and corrosion (rust) from the affected areas (by sanding, stripping, sand blasting). Clean the area again with Glasurit 360-4 Metal Cleaner and Glasurit 541-5 Wax and Silicone Remover. Refinish using the recommended undercoats and topcoats.

OVERSPRAY

Causes
  • Poor cleaning of substrate prior to painting
  • Lint containing overalls or clothes
  • Spray booth dust problem due to dirty and clogged filters causing incorrect air supply and incorrect overpressure
  • Intake of contaminated air (polishes, fine dust etc.) from other parts of the workshop
How to avoid
  • Clean thoroughly before applying the paint.
  • Use lint-free overalls and cloths.
  • Have air flow settings set by the booth manufacturer.
  • Ensure regular cleaning and maintenance of the spray booth and filters.
  • Ensure that polishing/finishing areas are away from the paintshop and are separated by a filtering and ventilation system.
Repair
  • Polish with Glasurit 562-1602 Fine Polishing Compound and finish with any standard high-gloss polish. For major problems, sand down completely and apply a new finish.

MATERIAL PEELING FROM PLASTIC SURFACES

Priežast
  • Prastas paviršiaus nuvalymas prie dažymą
  • Parinktos netinkamos nuriebalinimo priemonės
  • Plastikinė dalis nebuvo pašildyta prieš dažymą
  • Nenaudojamos sukibimą skatinančios priemonės
  • Šis plastiko rūšis nedažoma
Prevencija
  • Kruopščiai nuvalykite dalis naudojant švelnų ploviklį
  • Nuvalykite pagrindą prieš ir po kiekvieno žingsnio
  • Naudokite tinkamą plastiko valiklį
  • Plastikines dalis reikia pašildyti iki 60°C, kad pašalinti visus riebalus/likučius
  • Padenkite plastiko gruntą pagal techninių duomenų lapą
  • Įsitikinkite kad šios rūšies plastikas tikrai yra dažomas
Defekto taisymas
  • Pilnai pašalinkite dažus, kurie lupasi ir perdažykite paveiktus plotus

SCRATHES FROM CAR WASH BRUSHES

Causes
  • Hand-wash brush or car wash brushes which are too coarse and/or dirty
  • Insufficient pre-wash with insufficient amount of water
  • Exposing newly repaired paintwork to a car wash too early. A newly applied coating is less scratch-resistant when the paint is not dried for long enough or when excessive coats are applied or the wrong amount of hardener is us
How to avoid
  • Use suitable and clean brushes.
  • Thoroughly pre-clean the car with plenty of water.
  • Avoid washing the car too quickly after it received a new finish. Keep to recommended film thicknesses, drying times and amount of hardener.
Repair
  • Polish with Glasurit 562-1602 Fine Polishing Compound and finish with any standard high-gloss polish. Damage caused by car wash brushes cannot easily be prevented. Some cars are supplied with a scratch-resistant OEM clearcoat. We recommend repairing these coatings with Glasurit 923-447 HS VOC Clear, scratch-resistant. Glasurit 923-447 VOC is also suitable for use with other car models.

POLISHING MARKS

Causes
  • The sensitivity of the paint surface to polishing marks is greater when: the paint has not been allowed to dry for long enough; the film thickness is too high; the incorrect choice or amount of hardener has been used
  • Excessive pressure has been exerted on the polishing machine, (polish burnt in)
  • Polishing machine tilted during polishing process
  • Wrong polishing head
  • Aggressive/coarse polishing paste
  • Polishing when the painted surface is too hot from the oven or in direct sun light
How to avoid
  • Ensure the correct film thickness, drying times and amount of hardener and thinner are observed. Before polishing, allow the paint layers to dry sufficiently (rebake using infrared if necessary).
  • Do not press too hard or tilt the polishing head and use the correct head for the application being carried out.
  • Ensure that the paint surface is cool and/or not in the sun.
Repair
  • Polish with any standard high-gloss polish. If necessary, start polishing with Glasurit 562-1602 Fine Polishing Compound.

By continuing to browse this website, you agree to our Privacy Policy